Vežbe i mišićne grupeVeliki vodič
How to Squat Properly: Technique, Mistakes, Variations
The squat is the king of exercises – and the one most often performed badly. Step by step to perfect technique: stance, breathing, depth, knees, back, common mistakes and the right variation for your body.
 Autor:Michael Lohrberg
13 min čitanja
Ovaj članak još nije dostupan na srpskom. Prikazuje se na jeziku: English.
Ukratko
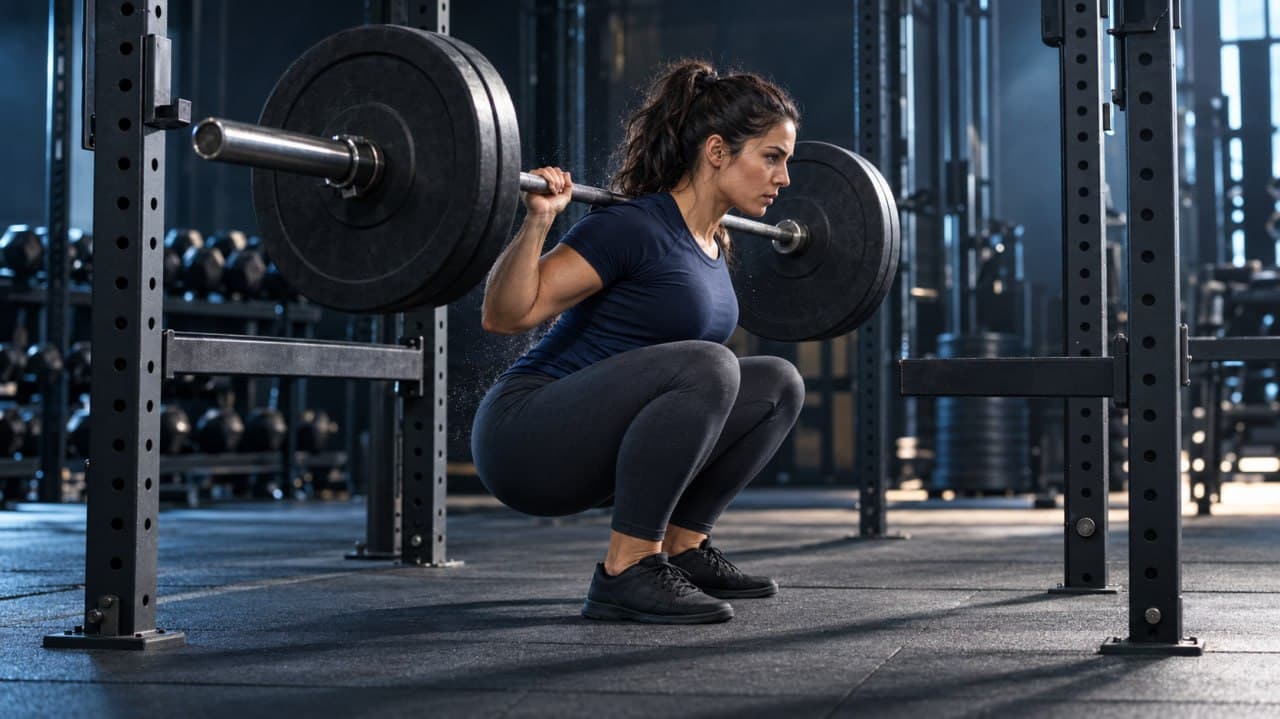
For a clean squat, stand roughly shoulder-width apart with your feet turned out slightly, take a deep breath into your belly before every rep and brace your trunk hard. Then bend at the hips and knees at the same time, push your knees out in the direction of your toes and go as deep as you can with a neutral back and full foot contact – ideally until your hip crease is at least level with your knees. Your knees are allowed to travel past your toes.
Sadržaj
Few exercises divide opinion like the squat. To some it is the king of all exercises, the indispensable core of every training plan. To others it is a knee and back killer best replaced by the leg press. The truth – as so often – lies in the execution. A well-executed squat is one of the most effective exercises for the thighs, glutes and trunk, improves jumping power, sprinting ability and everyday resilience, and can be progressed for years. A sloppy squat, on the other hand, really is an injury risk.
In this guide we take the squat apart: which muscles work, how to position the bar, how to stand, breathe and move, how deep you should go, which mistakes happen most often and which variation suits your build. It belongs to our Exercises & Muscle Groups topic, where we explain the key compound lifts step by step.
Which muscles does the squat work?
The squat is a multi-joint exercise: hips, knees and ankles bend and extend at the same time. That means many muscles work together:
- Quadriceps (front of the thigh): the main driver of knee extension, especially in the lower half of the movement.
- Glutes (gluteus maximus): extend the hip and are heavily involved in deep squats.
- Adductors (inner thigh): often underestimated, but one of the most heavily involved muscles in deep squats.
- Spinal erectors and trunk muscles: keep the spine stable and transfer force.
- Hamstrings and calves: stabilise, but contribute little to actually driving the movement.
Important for your programming: the squat builds the hamstrings very little, because they work at both the hip and the knee at the same time and their length barely changes. So always add an exercise such as the Romanian deadlift or hamstring curls. Our article on leg training gives a complete overview.
Preparation: rack, bar, shoes
Before your first rep, it pays to look at the set-up. Many technique problems start before the movement even begins.
The right rack height
Set the hooks so that the bar sits at about the height of your breastbone. You should have to bend your knees slightly to get under it and be able to unrack it with a short extension of your legs. If it is too high, you have to go up on your toes – an unnecessary risk with heavy weight. If it is too low, you waste strength just unracking it.
Also set the safety pins just below your lowest point. They catch the bar if you miss a rep. That is not a sign of weakness but of experience.
High bar or low bar?
There are two common bar positions:
| Variation | Bar position | Upper body | Typical for |
|---|---|---|---|
| High bar | on the upper traps | more upright | Muscle building, weightlifting, most lifters |
| Low bar | about 5–7 cm lower on the rear delts | leaning further forward | Powerlifting, maximum loads |
For muscle growth and getting started, we recommend the high-bar version. It is more intuitive, loads the quads more and places lower demands on shoulder mobility.
Shoes
Running shoes with thick, soft cushioning are unsuitable for squats: they give way under load and make your stance unstable. Ideal are flat shoes with a firm sole or dedicated weightlifting shoes with a slightly raised heel. The latter particularly help people with limited ankle mobility get deeper and stay more upright.
The technique step by step
The following instructions describe the high-bar back squat with a barbell. Most points, however, apply to every variation.
The perfect squat in 7 steps
- 1
Korak 1
Position the bar correctly
Set the rack hooks at about the height of your breastbone. Step under the bar and place it on your upper traps – not on your neck vertebrae. Grip a little wider than shoulder-width and squeeze your shoulder blades together.
- 2
Korak 2
Unrack and take two steps back
Straighten your legs to lift the bar out of the hooks. Take two, at most three, short steps back. More steps waste strength and stability.
- 3
Korak 3
Set your stance
Feet roughly shoulder-width apart, toes turned out 15 to 30 degrees. Your weight is spread evenly across the heel, the ball of the big toe and the ball of the little toe.
- 4
Korak 4
Breathe and brace
Breathe deep into your belly as if you wanted to push your belt outwards. Hold your breath and brace your entire trunk before you move.
- 5
Korak 5
Lower under control
Bend at the hips and knees at the same time. Push your knees out towards your toes, keep your back neutral and lower yourself over two to three seconds.
- 6
Korak 6
The bottom position
Go as deep as you can with a neutral back and full foot contact – ideally at least until your hip crease is level with your knees.
- 7
Korak 7
Stand up powerfully
Drive away from the floor through your whole foot. Chest and hips rise together. Only exhale once you are standing at the top, before the next rep begins.
The stance: wider is not automatically better
The ideal foot position depends on your build – above all on the shape of your hip joints and the length of your thighs. As a starting point: roughly shoulder-width, toes turned out 15 to 30 degrees. Experiment with an empty bar or light weights: the right position is the one in which you get deepest without your lower back rounding or your heels lifting.
A simple test: squat down as low as possible without weight while holding onto a door frame. Vary width and foot angle until the position feels most natural. That stance is your baseline.
Breathing: your built-in lifting belt
Breathing is the most underestimated part of the squat. Before you descend, breathe deep into your belly – not into your chest – and brace your abs as if someone were about to punch you in the stomach. This creates increased pressure in the abdomen that stabilises the spine from the inside. The technique is called bracing.
Hold your breath during the descent and the hardest part of the ascent. Exhale only once you are standing at the top – or, with high rep counts, just after the sticking point. If you have high blood pressure or cardiovascular disease, check with your doctor before using breath-holding techniques.
The movement: hips and knees together
A common coaching cue is "hips back". For many people this leads to leaning too far forward and turning the squat into a kind of good morning. Better: bend at the hips and knees at the same time, as if you were sitting down between your feet. Your knees travel forward and out in the direction of your toes, your hips back and down.
Your upper body naturally tilts forward a little – how much depends on your proportions. People with long thighs and a short torso have to lean further forward to stay balanced. That is not a mistake; it is physics. What matters is that your back stays neutral.
Tempo
Lower yourself under control over about two to three seconds, do not pause at the bottom (unless you are deliberately training pause squats), and then drive up powerfully. "Dropping" too fast loses tension and control; lowering extremely slowly wastes strength. More on the role of tempo in Time under tension.
How deep should you squat?
The question of the right depth is debated in gyms with religious fervour. Research gives a fairly clear answer: deeper squats build more muscle. In comparison studies, the glutes and adductors in particular grew considerably more with full squats than with half squats.
As a guide: your hip crease should be at least level with your knees, ideally below. At the same time, there is an important limit: only go as deep as you can with a neutral back and your heels on the floor. If your lower back rounds noticeably at the bottom – the so-called "butt wink" – that is a signal to go slightly less deep or to work on mobility.
What limits your depth
If you cannot get deep enough, it is usually down to one of these three factors:
- Ankle mobility: if your knees cannot travel far enough forward, your heels lift or you tip backwards. Fix: targeted mobility work (see Ankle mobility) and, in the short term, shoes with a raised heel or a weight plate under your heels.
- Hip mobility and anatomy: the shape of your hip joint determines how deep you get with which foot position. Experimenting with width and foot angle helps more than any stretching. Exercises in Improving hip mobility.
- Trunk control: many people actually get deep enough but lose tension at the bottom. Lighter weights, pause squats and goblet squats help here.
The 9 most common mistakes – and how to fix them
1. Knees cave in
The knees collapsing inwards (knee valgus) under load is the classic. Many people's knees cave in slightly, especially when standing up from the bottom. Slight movement is normal in heavy sets, but you should correct obvious caving: actively push your knees in the direction of your toes, as if you wanted to tear the floor apart with your feet. Also strengthen your glutes and adductors.
2. Heels lift
A sign of limited ankle mobility or weight shifted too far forward. In the short term, a raised heel and a conscious weight distribution across the whole foot help; in the long term, mobility work.
3. The back rounds
A rounded back under heavy load increases stress on the spinal discs. The cause is usually missing bracing, too much weight or a depth you cannot control. Reduce the weight, practise breathing and work your way back up.
4. The hips shoot up first
When standing up, the hips rise faster than the chest and the squat turns into a good morning. A common cause: relatively weak quads. Fix: think "chest and hips up together", and train front squats and pause squats.
5. Not enough depth
Many people only go halfway down because they can move more weight that way. That feeds the ego, not the muscles. Reduce the weight by 15 to 20 per cent and work your way back up at full depth.
6. Looking up
Looking at the ceiling overextends your cervical spine. Aim your gaze at the floor about two metres in front of you or straight ahead – your head stays in line with your back.
7. No upper-body tension
Loose shoulders let the bar drift. Squeeze your shoulder blades together, grip the bar firmly and actively pull it into your traps. A narrow grip, as far as your shoulder mobility allows, creates more tension.
8. Too many steps when unracking
Every step under heavy load costs strength and stability. Two short steps back, set your stance, done.
9. Impatience with progression
The squat loads many joints and structures. Tendons and ligaments adapt more slowly than muscles. Progress in small, consistent steps instead – how that works is explained in Progressive overload.
Which squat variation suits you?
The barbell back squat is not the only option – and not the best one for everyone. Depending on your goal, experience and build, different variations make sense.
| Variation | Advantages | Ideal for |
|---|---|---|
| Goblet squat | teaches the movement, upright torso, easy to scale | Beginners, warm-ups, home training |
| Back squat (high bar) | very easy to progress, lots of muscle growth | Muscle building, most lifters |
| Front squat | more quads, more upright, less load on the back | People with back problems, athletes |
| Box squat | controlled depth, technique learning | Beginners, strength training |
| Safety bar squat | easy on the shoulders | People with limited shoulder mobility |
| Bulgarian split squat | single-leg, evens out left-right differences | Accessory work, home gym |
For getting started we recommend the goblet squat: you hold a dumbbell or kettlebell in front of your chest, which automatically keeps you more upright and makes the movement intuitive. Once you can do 25 to 30 kg cleanly for ten reps, the barbell is the next step. Detailed comparisons are in Front squat vs. back squat and Bulgarian split squat.
Body proportions and the squat: why everyone looks different
If you compare videos of experienced athletes, you will notice that hardly any two squats look the same. Some stay almost vertical, others lean well forward, some stand narrow, others very wide. That is not down to technique errors but to proportions and anatomy.
What matters most is the ratio of thigh length to torso length. In a squat, the combined centre of mass of you and the bar has to stay over the middle of your foot, or you tip over. If you have long thighs and a short torso, your hips travel further back as you descend – so you have to lean your upper body further forward to stay balanced. If you have short thighs and a long torso, you can stay much more upright.
Three practical consequences follow:
- Do not blindly copy someone else's technique. The squat of a 1.70-metre weightlifter with short legs is no benchmark for a 1.95-metre lifter with long thighs.
- Long thighs benefit from a wider stance and raised heels. Both reduce the lever and allow a more upright position. The front squat or the goblet squat often suit long-legged lifters better too.
- Hip anatomy determines your foot angle. The depth and orientation of the hip socket are innate and differ considerably between people – even between the left and right side. No stretching changes that. If you position your feet so that your hips "have room", you will get deeper with less discomfort.
Film your squat from the side and look for two things: does the bar move vertically over the middle of your foot? Does your back stay neutral? If both are true, your torso angle is right for your build – no matter how it looks compared to others.
Equipment: belts, knee sleeves, heel lifts
In the gym you will see all sorts of equipment at the squat rack. What makes sense?
Lifting belt: a sturdy belt gives your abs something to push against. That increases intra-abdominal pressure and therefore stability. It is useful for heavy sets from about 80 per cent of your maximum. Beginners should first learn to breathe and brace properly without a belt – a belt reinforces good technique, it does not replace it.
Knee sleeves and wraps: thin neoprene sleeves keep the knee warm and give a pleasant feeling of stability. They do no harm and can help with minor discomfort. Tight knee wraps, as used in powerlifting, store elastic energy and increase the weight you can move – for muscle building they are unnecessary.
Raised heels: a small weight plate under your heels or weightlifting shoes immediately improve depth if your ankle mobility is limited. That is not cheating but a legitimate adjustment – as long as you work on your mobility in parallel.
The general rule: equipment is a tool for specific situations. If you do every warm-up set with a belt and sleeves, you train your own stability too little.
Squats in your training plan
How often, how many sets?
For muscle growth, two squat sessions per week with 3 to 4 working sets of 6 to 12 reps each work well. If you train heavier on one day (6–8 reps) and a little lighter on another (10–12 reps), you spread the load sensibly. The squat is built in exactly like this in the 3-day full-body plan for beginners.
Warming up before heavy sets
Never jump straight in with your working weight. A proven scheme for a working set at 100 kg:
| Set | Weight | Reps |
|---|---|---|
| 1 | empty bar (20 kg) | 10 |
| 2 | 50 kg | 5 |
| 3 | 70 kg | 3 |
| 4 | 85 kg | 2 |
| 5 | 95 kg | 1 |
Warm-up sets up to a working weight of 100 kg
Example from the table above: the weight goes up and the reps go down – so you're warm without tiring before the first working set.
- Set 1empty bar, 10 reps20 kg
- Set 25 reps50 kg
- Set 33 reps70 kg
- Set 42 reps85 kg
- Set 51 rep95 kg
Prikaži podatke u tabeli
| Kategorija | Weight | |
|---|---|---|
| Set 1 | 20 kg | empty bar, 10 reps |
| Set 2 | 50 kg | 5 reps |
| Set 3 | 70 kg | 3 reps |
| Set 4 | 85 kg | 2 reps |
| Set 5 | 95 kg | 1 rep |
Before that come five minutes of easy movement and a few mobility exercises for the hips and ankles. You will find a compact routine for this in our 10-minute mobility routine and in the article on warming up before strength training.
Progression
Use double progression: work within a rep range, say 6 to 10. Once you hit the top of the range in all sets, increase the weight by 2.5 to 5 kg next session. Beginners can often add weight every week for the first few months; more experienced lifters progress more on a monthly basis.
Squats and knee pain
"Squats ruin your knees" is one of the most persistent myths in fitness. Studies show the opposite: properly dosed strength training with squats strengthens the structures around the knee, and weightlifters do not have a higher rate of knee injuries than many other sports.
Still, some people do experience pain. The most common causes are increasing weight or volume too quickly, poor knee tracking and pre-existing problems. If it hurts: reduce load and depth until the exercise is pain-free, and have persistent symptoms checked by a doctor or physiotherapist. We discuss possible causes and solutions in detail in Knee pain when squatting.
Squats without a barbell: training at home
No rack, no barbell? No problem. You can train the squat effectively at home too – you just have to be more creative with the load. Goblet squats with a dumbbell, Bulgarian split squats, pistol squat progressions and squats with a slow lowering phase or a pause at the bottom make even your own body weight challenging. You will find a complete plan in Home workout without equipment, and we explain the single-leg king of squats in Learning the pistol squat.
Conclusion: learn it properly once – and benefit for life
The squat deserves its reputation as the king of exercises. It builds legs and glutes like hardly any other exercise, strengthens the trunk and makes you more resilient in everyday life. The prerequisite is clean technique – and the patience to learn it before you go heavy. Take the first few weeks, film your sets from the side, work on your mobility and progress in small steps. Then the squat turns from a dreaded obligation into an exercise you look forward to.
Next, it is worth looking at the second big compound lift: our bench press guide explains technique, mistakes and variations for a stronger chest. And how the squat fits into a well-designed overall programme is shown in our muscle-building guide.
Česta pitanja
Can my knees go past my toes when squatting?
Yes. In a deep squat, the knees travelling past the toes is anatomically necessary for most people and not harmful. What matters is that your knees track in the direction of your toes and do not cave inwards.
How deep should I squat?
As deep as you can go under control with a neutral back and full foot contact. For muscle growth, a depth where the hip crease is at least at knee level is recommended, because deeper squats built more glute and thigh muscle in studies.
Are squats bad for your knees?
No. Properly performed and sensibly progressed squats strengthen the muscles, tendons and ligaments around the knee. Problems usually come from progressing too fast, poor technique or pre-existing conditions. If you already have knee pain, get it checked by a doctor first.
How many sets and reps of squats for muscle growth?
For muscle growth, 3 to 4 sets of 6 to 12 reps, once or twice a week, work well. End each set with one to three reps in reserve so your technique stays clean.
Do I need weightlifting shoes for squats?
Not necessarily. Flat, firm shoes are enough for most people. Weightlifting shoes with a raised heel can help if your ankle mobility is limited or you want to stay more upright in front squats.
Should I wear a belt when squatting?
A lifting belt can help you build more trunk tension in heavy sets. Beginners should first learn to breathe and brace stably without a belt and only use one for loads close to their personal maximum.
Oznake
- Squat
- Back squat
- Leg training
- Technique
- Compound lifts
O autoru
Michael Lohrberg· Osnivač kompanije Syrax
Michael Lohrberg je osnovao Syrax 2026. godine. Vojna služba sa misijom u inostranstvu, u industriji od 2010, rad u smenama i dva posla istovremeno – LEEK Pulse Pro je nastao iz pitanja koliko oporavka zaista ostaje u svakodnevici. U magazinu piše o treningu, snu i regeneraciji – praktično i zasnovano na istraživanjima.
Više o MichaeluOvaj članak služi opštem informisanju i ne zamenjuje savet lekara. Ako imate bolesti, bolove ili nedoumice, razgovarajte sa lekarom pre promene treninga ili ishrane.
Syrax Magazin